Laminar Jet Fountain
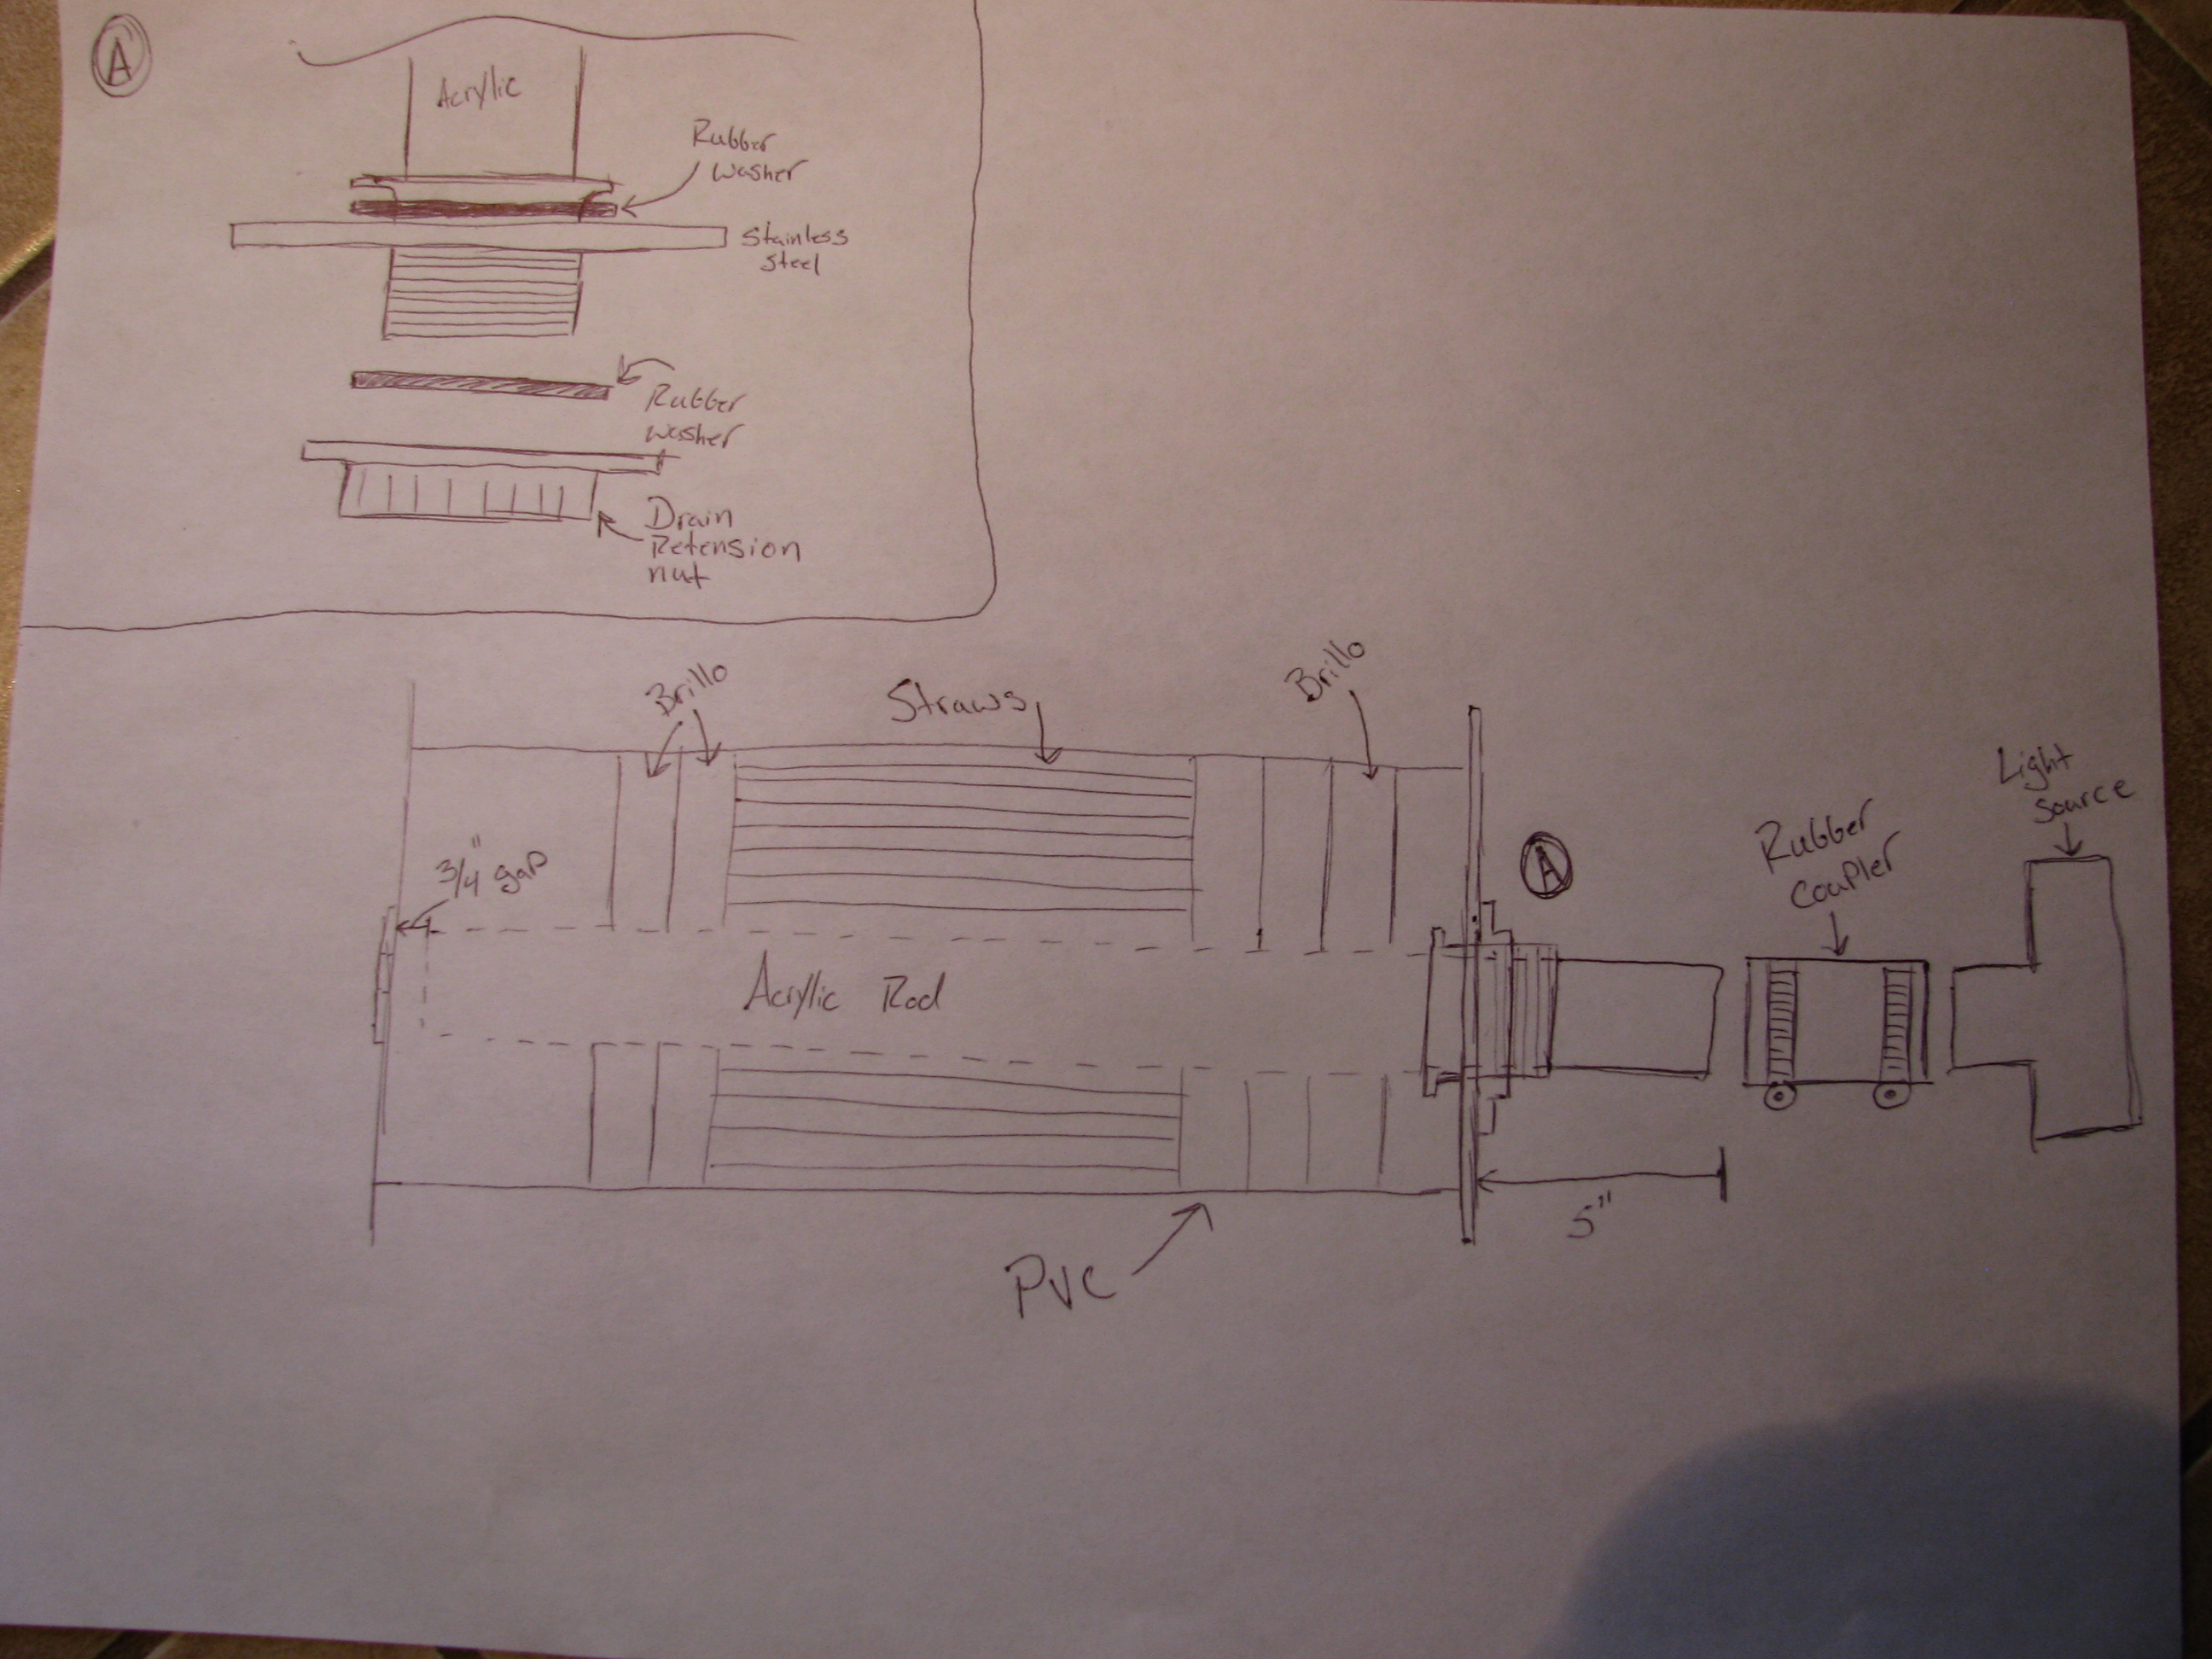
This write up covers my laminar jet build. Like most laminar jets this one uses PVC as the enclosure, Brillo pads and straws to create a laminar flow, and a standard 3/4″ garden hose attachment to pump the water into the unit. However there are a few differences between this jet and others you might see. The water inlet is drilled into the side of the pipe, rather than pertruding from the bottom. Using a 1″ diameter pipe with the PVC 3/4″ garden hose attached. Once the hole is drilled a small piece of PVC is filled down and the shavings are collected. The shavings can then be combined with PVC cement creating a 100% solids, particulate bond. Allow this to dry for about 15 minutes to a half hour. The purpose of this is to further take the turbulence out of the water by dispersing the flow of water directly into the side of the piece of Brillo rather than force that will create turbulence upward toward the exit tip.


Few other laminar jets use the compression plate method for the ends of the jet. An after thought, this could be substituted for 1/2″ acrylic if you wanted to see what was going on inside the jet. Just be careful of the amount of torque applied to the acrylic, as you don’t want to crack it. The exit point of the water uses a standard Stainless steel washer that is filed down to a knife edge. This will limit the amount of surface area that contacts the water as it exits the jet, thus creating a more laminar flow. The stainless washer is attached using 1/8″ stainless pop rivets. There is a larger rubber washer that is used as a gasket between the washer and top plate. All openings are thoroughly lathered up with silicone caulk.


The back plate and lighting mechanism is where the real change in design is seen. Most lighted laminar jets use fiber optic filaments to carry light through the jet and emit it into the stream of exiting water. This is a great idea, however the filaments tend to be very fragile and require you to run them to the location of your lighting emitter and controller. This design eliminates the need for the fiber optic filaments by using a piece of PMMA core acrylic rod which has the same optical properties as the fiber optic filaments. Some advantages of this include, ruggedness of the rod versus the filaments; the ability to make a stand alone lighting rig (waterproofed) that can attach to the back of the rod with a cheap and simple fernco or no-hub pipe fitting; and the enlarged surface area allows the light to emit much more proficiently into the stream of water.
To prep the acrylic rod, cut it square at the end and begin to smooth the end using a file. Once the deep saw marks are removed continue smoothing the end using sandpaper. Start at 200 grit and work your way up until you get to 1000 grit. A buffing compound and cotton rag can then be used to remove the haze from the end of the acrylic rod.


A simplified install procedure was created using cheap and available parts (other than the acrylic rod). A standard drain cache, which is used in the basin of most bathroom sinks costs about $3 and is perfect for creating a “through hole” penetration into the bottom plate, making it water tight. The 3 tabs within the bottom of the drain cache are snipped off with side cutters, if you are good you can use this to properly align the rod within the cache. Once the tabs are removed the cache is slid over the rod until approximately 4″ are sticking out of the threaded end. Plumbers putty is used to seal the gap between the rod and the drain cache. Once the plumbers putty is in place the rod with attached cache is stood upright and filled with epoxy resin.


Once the epoxy resin is cured a whole-saw is used to cut a 1 7/8″ hole into the back plate of the jet. The acrylic rod is pre-assembled onto the back plate by sliding the rod into the hole cut into the plate with the threaded end point outward toward the back of the jet. Silicone caulk and a rubber O-ring is used on the inside of the drain cache. Another O-ring, caulk, and retention nut is used on the exterior of the plate to retain the position of the rod on the back plate. Allow the silicon to fully cure for about two hours, depending on thickness.


Once the caulk is cured the jet can be assembled. Small mats of rubber was used to create a gasket between the stainless plates and the PVC pipe. Place the plate with the larger end of the acrylic rod facing upward. Cut up your Brillo to fit snug within the 4″ piece of PVC, cut a hole in the center so that it can slide over the acrylic rod. Place the rubber sheeting and PVC onto the plate. Start with the coarse Brillo at the bottom of the jet, follow this by a few layers of fine Brillo. Straws are then inserted so that they are parallel with the PVC (perpendicular to the front and back plates. Insert the straw until you can’t fit any more into the jet. Finish off with a few more layers of Brillo. Keep the Brillo about an inch from the end of the acrylic rod.


Another sheet of rubber and the top plate can now be placed onto the top of the PVC. Carefully insert the threaded rods through the holes in the corners of the plates. Put all the rods in and tighten them finger tight. Take a wrench and tighten down the nuts on the threaded rods. Turning the wrench about a half turn on the first nut, then do the same on the nut that is kiddy corner from it. This will ensure a flat and equal pressure applied downward onto the rubber sheeting. Once all of the nuts are tight you are ready to try out the jet. A regular garden hose can be connected, this is not the best for a smooth laminar flow, but we will discuss making a cheap bypass tank which uses an air pocket to smooth out the flow of water exiting the jet. To light the stream of water simply place any light emitting device at the end of the acrylic rod and it will transfer into the stream of water. Stay tuned for proper pump selection, bypass tank construction, and other cool features that weren’t covered here.


9 comments
Leave a Reply to TheCreator Cancel reply
You must be logged in to post a comment.
What, no comments yet?!? Cool project; I remember the first time I saw one, and have been wanting to build my own ever since!
– Steve
Nope you are the first Steve! All of the good people at HackAday.com have been commenting up a storm. Feel free to browse their site. They have a lot of interesting stuff. Thanks for the encouragement. Also, Awesome CNC solder paste dispenser you have on your site. Good Job!
Hi
I drilled 1/2 inch hole at the outlet of 4″ cap and jet works perfectly fine. Everone says that very thin washer shall be used. Thanks for nice and detailed description.
You’re welcome. I agree that the 1/2″ hole in the cap would work just as well. The washer is not nescessary unless you are trying to experiment with different stream shapes or different degrees of angle where the water contacts the outlet. Also note that at higher pressure, small imperfections or larger surface area contacting the stream will cause it to become turbulant and break-up earlier than expected.
This is fantastic to see but I just don’t understand how to get the light through my PVC pipe laminar flow system.The how to build a laminar flow for $15. Do I drill another hole in the bottom next to where the water goes in and put in an acrylic rod? How far up does the rod go, thyrough the straws into the top water space? This probably sounds really basic but I just cannot seem to grasp hw to do it.
Hi Kiwigirl. Here are a few pictures that might be able to explain it better than i can with words.
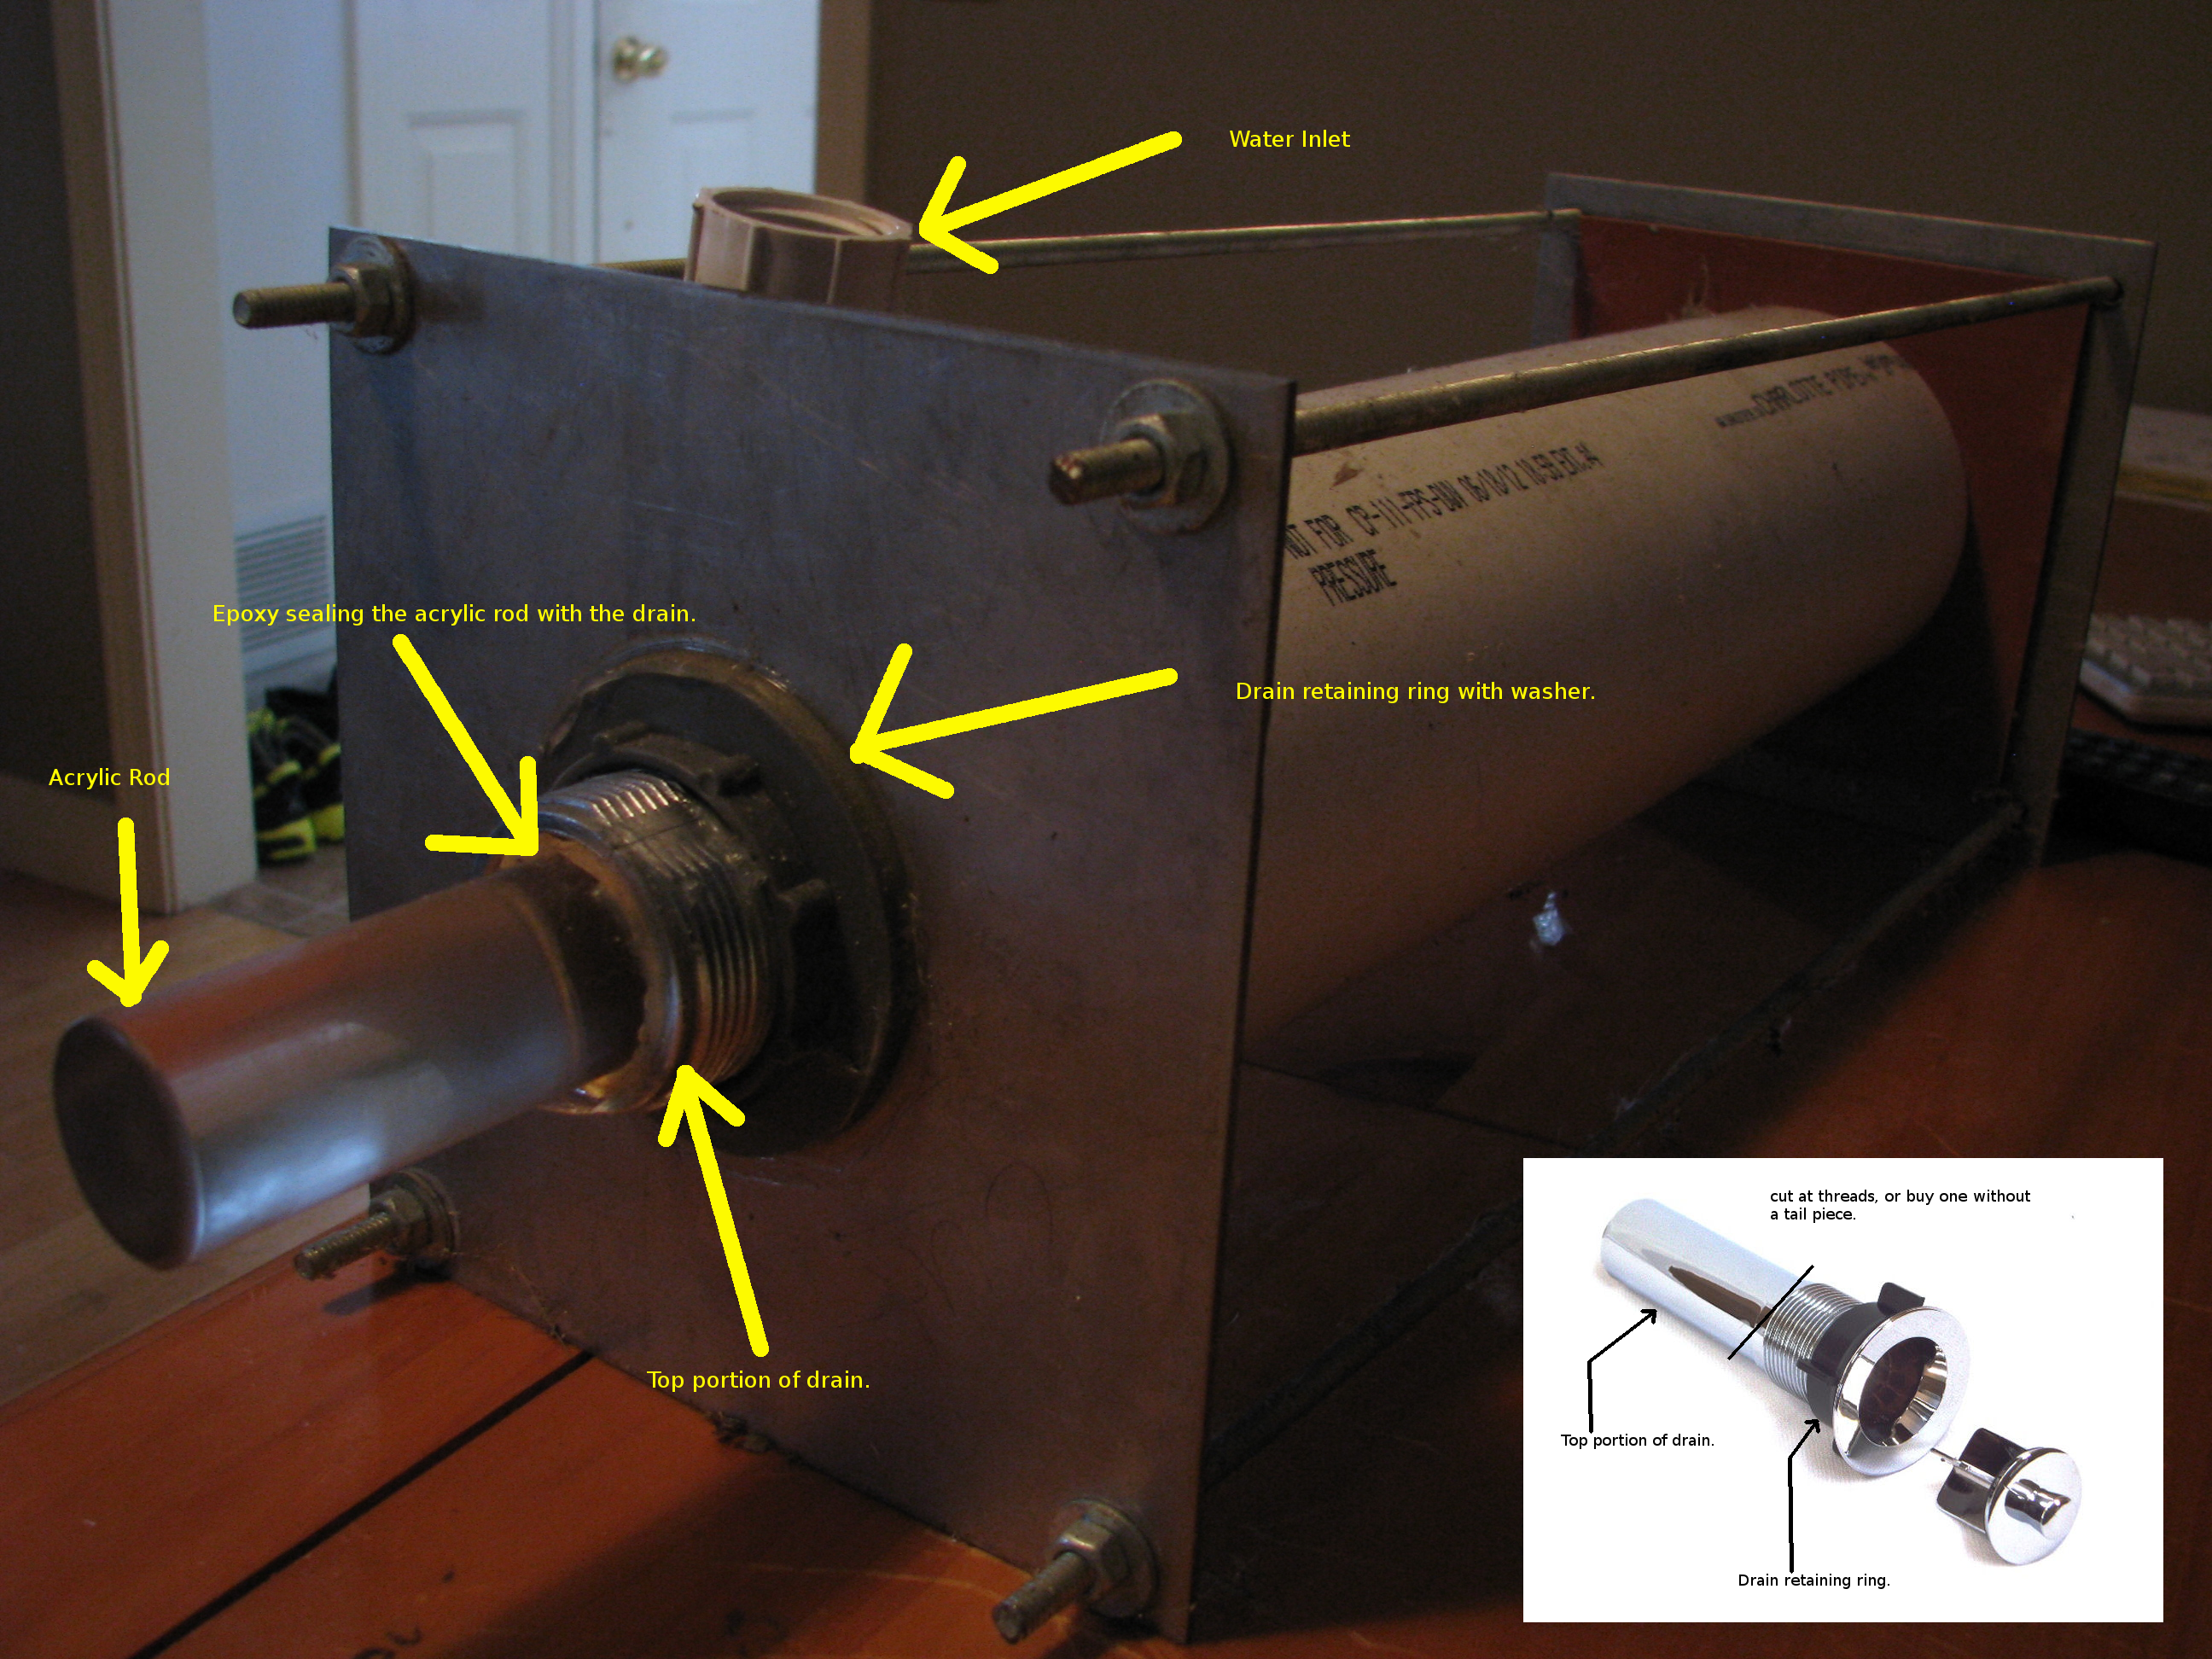
To keep the epoxy in the drain trap fill the tighter end with hot glue, or some plumbers putty. Then flip the rod and drain over and fill from the wider end of the drain flange. Allow to sit for about an hour or so before trying to assemble the rod and drain onto your laminar jet. If you have any other questions feel free to ask!
Also, if you are looking to do your own lighting you should take a look at This circuit that is used to drive some 5mm RGB LEDs and This code that is used on the micro controller.
Hi,
I am thinking about starting one of these Jets as a first build idea. Have you got anywhere with part 2 yet, i.e pump selection and stuff?
Also good work so far!
Hi dave,
Sorry i’m a little late with the reply. I have yet to compile all my information into a write up for the pumps. I have found realistically, that if you want the jet to shoot more than about 2 feet you are going to end up buying a very expensive inline pump ($1200). I am currently searching for alternatives and experimenting with certain bypass tanks, and attachments to add onto the jet. I will email you when I finish the write up. Thanks.